Documentation
For Github Pages view here: https://migg3y.github.io/BaunDroneAi/
Prelude
General information regarding the drone can be viewed in the documentation presented by Prof. Dr. Baun himself: https://www.christianbaun.de/Master_Projekt_WS2526/index.html
Drone
The drone is mainly as in the same configuation as documented in the documentation provied by Prof. Dr. Baun
Modifications
The camera was changed from a Raspberry Pi Camera Module 2 to a Raspberry Pi Camera Module 3 (wide)
Installed INAV 8.0.1 as operating system to the flight controller
Added a servo as documented in the section: “Hardware Wiring: Servo Release Mechanism”
Navigation posistion hold
Using the included GPS and Compass module we set up the position hold function for the drone:
For the setup we configured in the “Ports Tab” of INAV the port UART5 as “Sensors” and set it to GPS. Next in the GPS Tab we enabled GPS and selected all three possible GPS-Satellite for better coverage. In the alligment tool tab we also adjusted the alligment of the flight controller and magnet alignment to match our drones setup. With those steps complete and all changes saved and the drone rebooted we also set a Chanel of our remote (CH6 - 1500) to enbale the “NAV Pos Hold”.
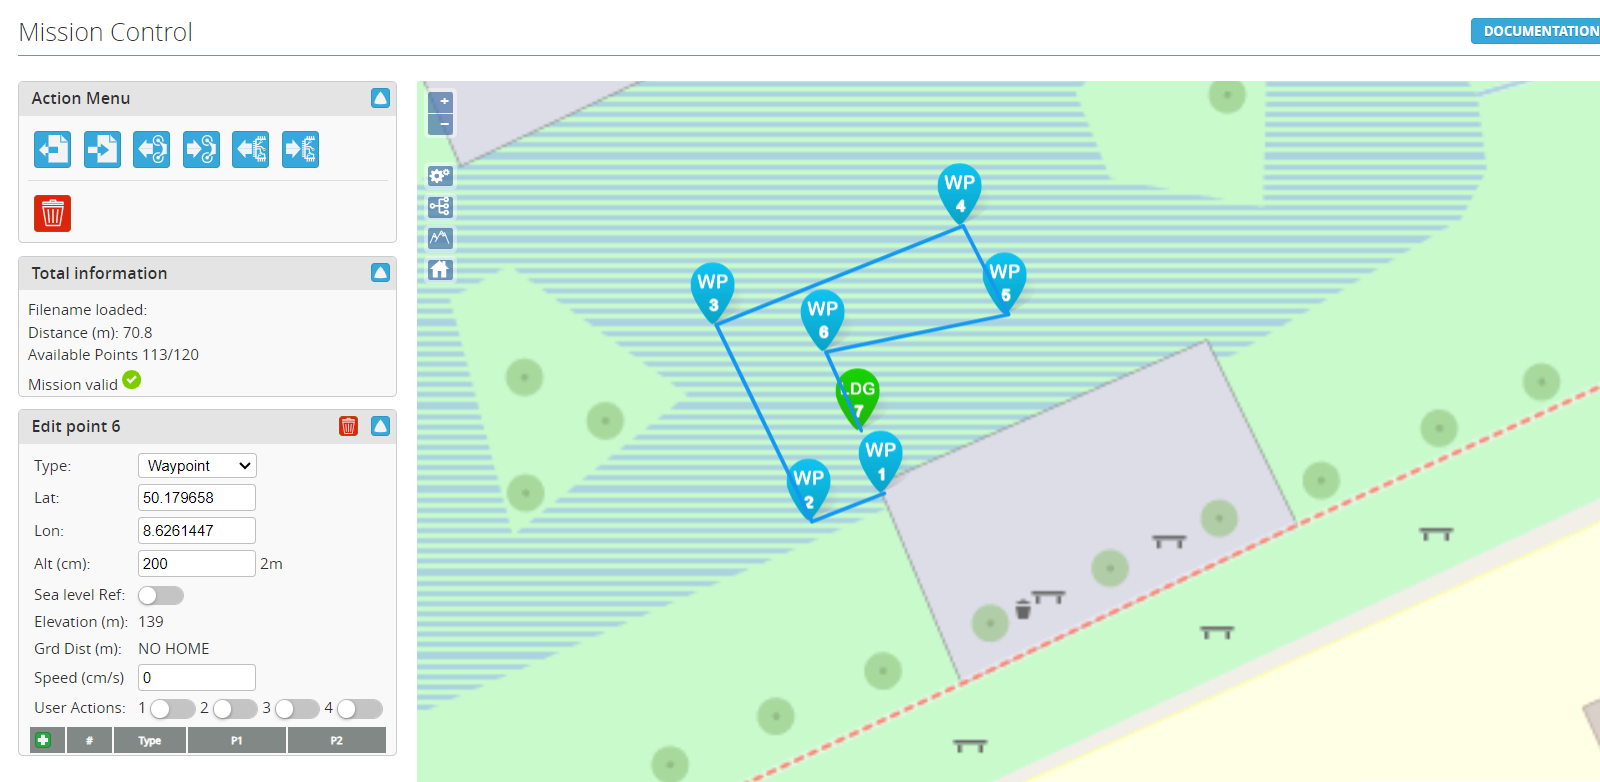
Drone Mission Control
As INAV does not allow dynamic routing over the raspberry pi, to set a route it has to be configured in the mission controll tool of INAV and saved to the eprom of the flight controller before takeoff. With navigation postion hold already working the setup is straight forward:
In the “Controll Tab” of INAV we added new waypoints that are set as the route of the drone. Next we adjust the altitude of each waypoint to match the height at which we want to fly our drone. The latitude and longitude data is already set by just placing and moving the waypoints around the map in the “Mission Control” window.
For the last waypoint we added the “Landing” parameter so the drone lands at the postion of the end of the route. Similar to the navigation position hold function we also mapped a seperate channel (CH7 - 2000) to activate this function.
AI Drone Detection & Delivery System
This repository provides a framework for researchers and students to implement autonomous person detection and payload release using a Raspberry Pi Zero 2 WH and Google Coral TPU.
Frontend
Please go into the frontend folder of this repository to and check out the README.md there to find out about setting up the frontend web application.
System Architecture
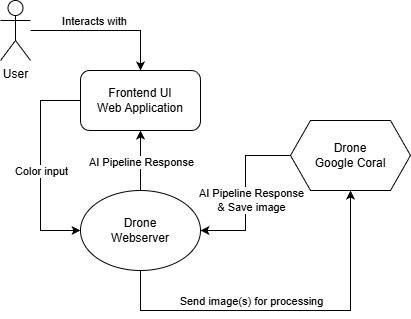
The system follows a distributed architecture with three main components: a web-based frontend, a central drone webserver, and the physical drone platform with onboard processing capabilities.
Users interact with the system through a frontend web application where they can input target clothing colors (currently supporting black, white, gray, red, green, and blue). The interface provides real-time feedback and displays detection results as the drone processes images during flight operations. The frontend communicates with the drone webserver, which acts as the central coordination hub managing all system interactions.
The drone webserver receives color search requests from the frontend and forwards them to the drone’s onboard system, orchestrating the entire image processing workflow. When the drone captures images during flight, the webserver receives them and sends them to the AI pipeline for analysis. Detection results are then relayed back through the webserver to the frontend for user visualization.
The physical drone operates autonomously or semi-autonomously using iNav flight control. The Raspberry Pi Zero 2 WH captures images via the Pi Camera Module 3 and handles communication with the webserver. The onboard Google Coral USB Accelerator enables edge inference capabilities, though the primary AI pipeline runs server-side for more complex analysis. This modular architecture separates concerns between user interaction, flight control, image acquisition, and AI processing, allowing for independent development and testing of each component while maintaining real-time operational capabilities.
Technical Pipeline Overview
The system implements a edge-computing pipeline for real-time person identification and spectral analysis:
- Inference Engine: Utilizing a MobileNet SSD (Single Shot Detector), the pipeline offloads neural network computations to the Google Coral TPU. This allows for low-latency detection while preserving the Pi’s CPU for flight-critical tasks.
-
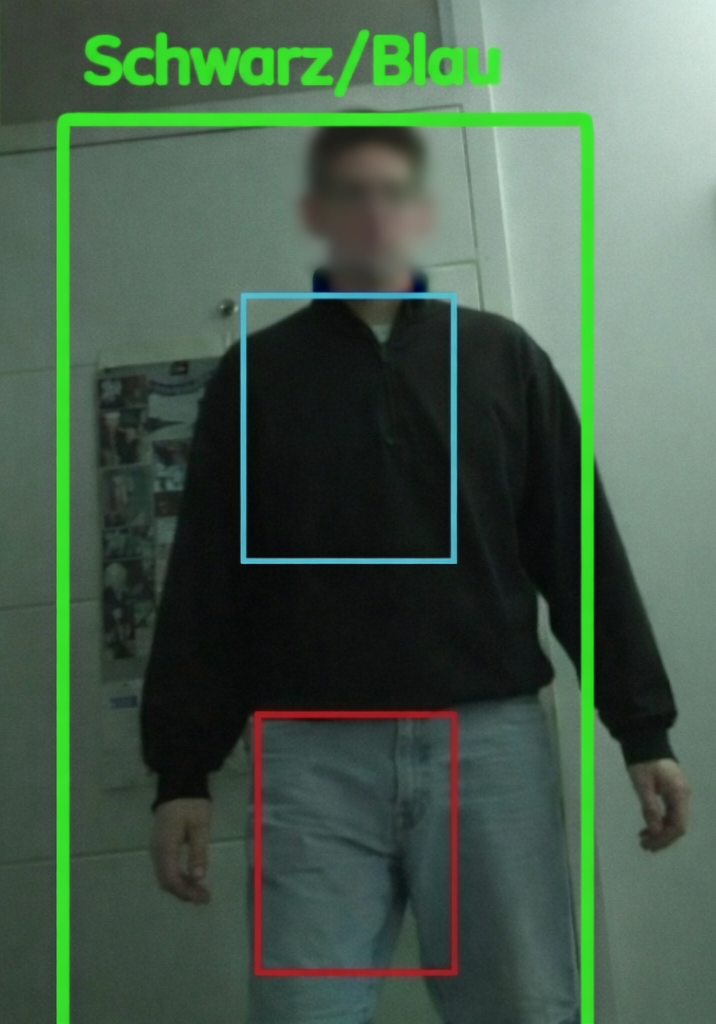
Anatomical ROI Partitioning: Upon detection, the generated bounding box is partitioned into fixed Regions of Interest (ROI). By targeting the torso (15-45% height) and lower limbs (65-90% height), the system isolates clothing data from environmental noise.
- Heuristic Color Classification: Image data is transformed into the HSV (Hue, Saturation, Value) color space. This allows the system to decouple chromaticity from luminance, providing robust classification of colors (Red, Green, Blue, Black, White, Grey) under dynamic outdoor lighting conditions.
Installation Guide for stetting up the raspberry on the drone
Follow these steps to set up a clean Raspberry Pi OS (64-bit) for the drone server.
Hardware Wiring: Servo Release Mechanism
The system uses a Tower Pro Micro Servo 9g SG90. To interface it with the Raspberry Pi, follow the pinout diagram below.
| SG90 Wire Color | Function | Raspberry Pi Pin (Physical) | GPIO Number |
|---|---|---|---|
| Brown | Ground (GND) | Pin 6 | GND |
| Red | Power (5V) | Pin 2 | 5V |
| Orange | PWM Signal | Pin 12 | GPIO 18 |
Wiring Steps:
- Connect the Brown wire to any Ground pin (e.g., Physical Pin 6).
- Connect the Red wire to a 5V pin (e.g., Physical Pin 2).
- Connect the Orange (Signal) wire to GPIO 18 (Physical Pin 12). This pin is used because it supports hardware PWM, ensuring smooth servo movement.
System Preparation
Connect to your Raspberry Pi via SSH and install the required system dependencies:
# Update and install system build tools
sudo apt-get update && sudo apt-get upgrade -y
sudo apt-get install -y git python3-pip libopencv-dev python3-opencv
Hardware Acceleration (Edge TPU)
Install the official Google Coral runtime to enable the USB Accelerator:
# Add the Coral repository
echo "deb https://packages.cloud.google.com/apt coral-edgetpu-stable main" | sudo tee /etc/apt/sources.list.d/coral-edgetpu.list
curl https://packages.cloud.google.com/apt/doc/apt-key.gpg | sudo apt-key add -
sudo apt-get update

# Install the runtime library
sudo apt-get install libedgetpu1-std
Clone and Install Python Libraries
Navigate to your project folder and install the necessary Python environment:
# Clone the repository
git clone https://github.com/Migg3y/BaunDroneAi
cd BaunDroneAi/drone

# Install standard libraries
pip3 install flask numpy opencv-python gpiozero picamera2

# Install the Edge TPU library (PyCoral)
pip3 install --extra-index-url https://google-coral.github.io/py-repo/ pycoral
Server Operation
Starting the Service Run the server from the drone/ directory. It is highly recommended to use tmux so the process remains active if the SSH connection drops.
#start server
python3 drone_server.py
API Documentation
Once running, the server listens on port 5000. You can trigger the following endpoints from your Ground Control Station or Mobile App:
GET /setColor?json={"oberteil":"color", "unterteil":"color"}
Function: Initiates a 120-second active search for a person.
Logic: The loop captures frames and checks if detected persons match the requested color scheme.
Success: If a match is found, the server stops the search and saves last_match.jpg.
GET /getImage
Function: Serves the latest successful detection image.
Output: A JPEG image featuring debug markers (Green: Person, Blue: Shirt ROI, Red: Pants ROI).
GET /servo
Function: Controls the payload release mechanism via GPIO 18.
Sequence: Rotates to 110° (release), waits 1 second, and returns to 0° (locked).
Encountered Challenges
During the project phase there were several problems and challenges:
-
The first Raspberry PI Zero 2 WH broke down after an unfortunate crash against the ceiling, destroying the WLAN-module -> This led to a temporary compromise of using a leftover Raspberry Pi Zero 1 WH, which was compatible with the flight-controller, however, it was later discovered that it wasn’t compatible working the Google Coral due to different ARM architectures. Pi Zero 1 uses BCM2835 with ARMv6 architecture while Google’s Edge TPU runtime libraries require ARMv7 or ARMv8.
-
Using iNav, the drone was only capable of operating autonomous if almost all (approx. ~7) satellites were “visible” or rather communicating the drone. -> This meant that working in an environment with no real signals limited the operational usage of the drone to manual inputs only.
-
For some reason the channels on the flight controller were sending way too many messages/signals/packages, which had overstimulated the Raspberry PI -> Due to this, it wasn’t feasible to establish a connection between the Raspberry PI and the flight-controller, which meant that the only way left to initiate commands was to implement a webserver on the Raspberry PI and call it via API calls.
Research Best Practices
Auto White Balance (AWB): The IMX708 sensor requires approximately 2 seconds of exposure before the search starts to calibrate colors accurately.
Saturation Thresholds: For grey-scale detection (Black, White, Grey), the system uses a saturation threshold. If your research environment has specific lighting (e.g., sunset), you may need to adjust the s < 70 threshold in get_color_advanced.
Signal Interference: Use 5GHz Wi-Fi for the API connection to prevent interference with standard 2.4GHz RC transmitters.